Monday, April 9, 2012
Mango-Blueberry Salsa on chips
Yes--the mango-blueberry salsa that I made for grilled tuna is great on chips! Now I just need to have some guests over so I have an excuse to make it again. . .
Salsa recipe here.
Baked tortilla recipe here. (Of course purchased chips would be fine also.)
Saturday, March 31, 2012
Mango-Blueberry Salsa (with grilled tuna)
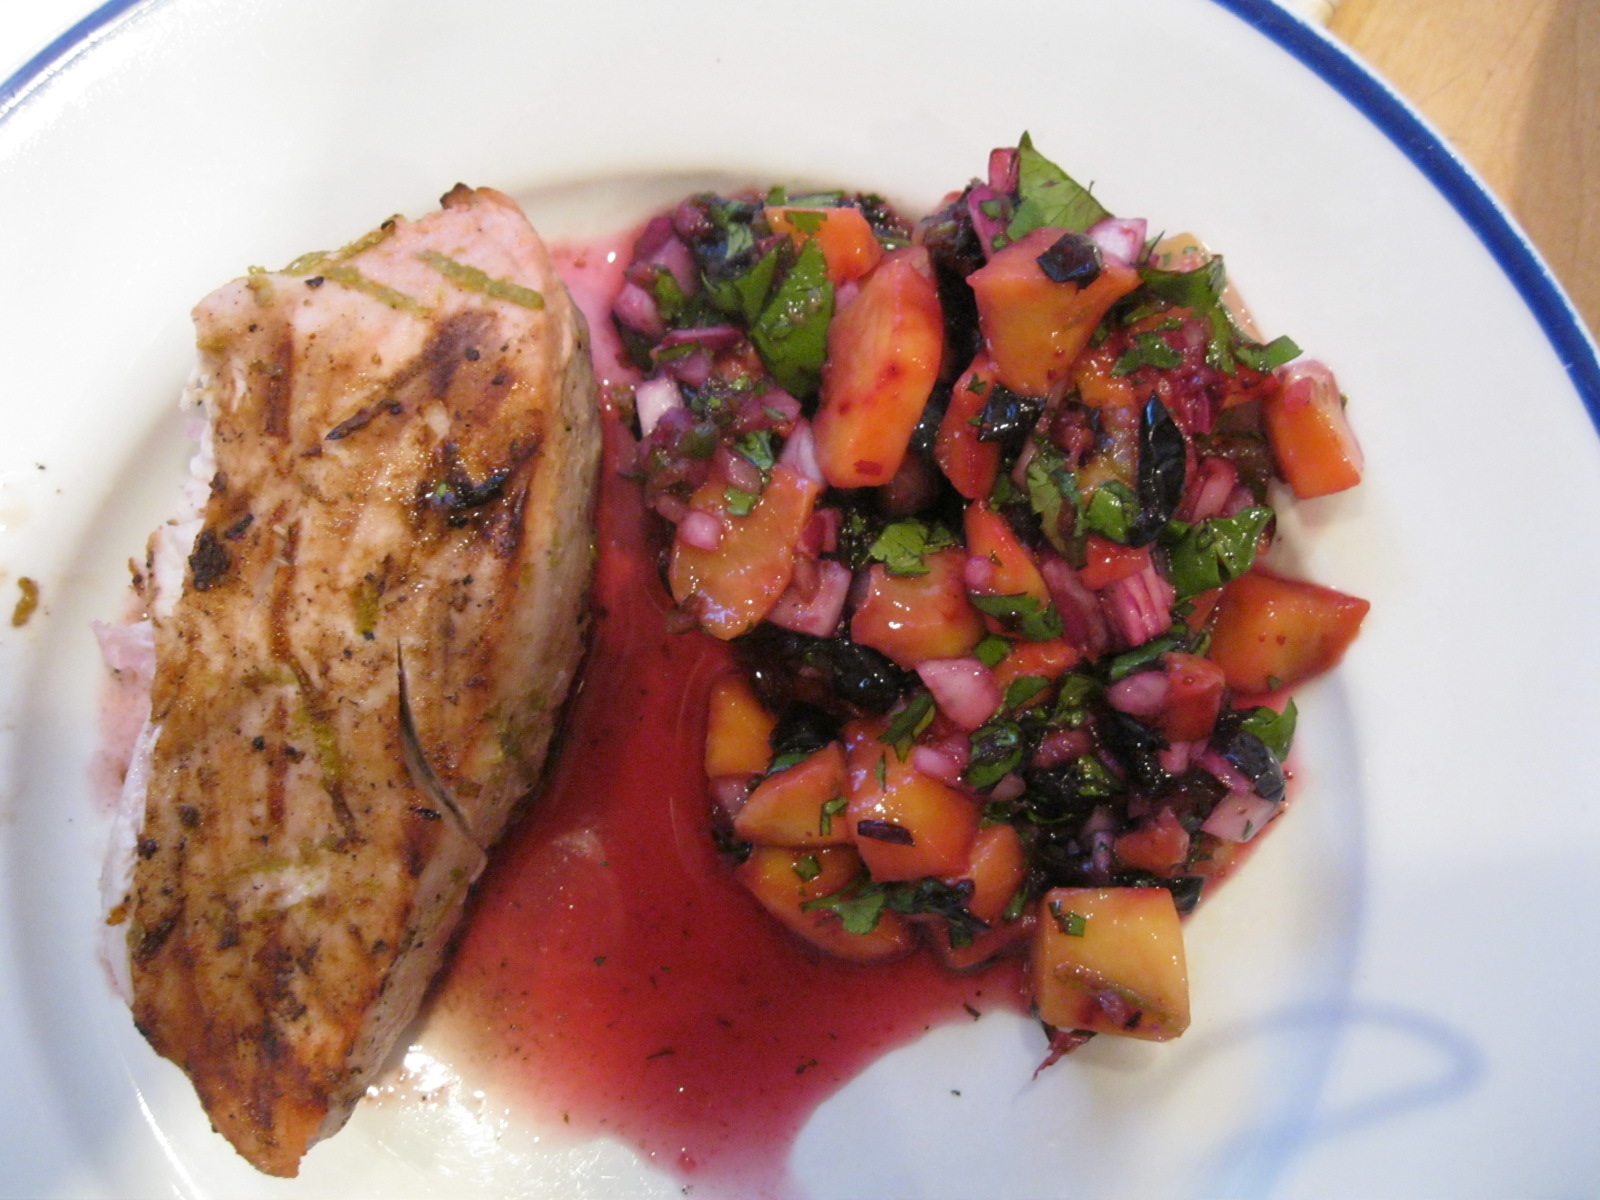
I was at an upscale grocery store in Peoria yesterday (Fresh Market--like Whole Foods but smaller), and bought some fresh tuna. I also picked up a large mango on sale. Came home and looked for a recipe to make today, and came up with the recipe below. The real star of the show is the mango-blueberry salsa, which was lovely on the tuna, and I'm sure would be great on any number of other things--chicken, other fish, or even as a dip with chips. I served this with a side dish of orzo, and it was good with that also. I can't always find a nice piece of tuna, but the salsa ingredients are easy to come by!
I'm not much of a food photographer, but here's a picture I thought to take before we sat down to eat:
MARINATE FISH
Mix together the remaining 1 t. lime rind, 3 T. lime juice, 1/2 t. salt, ground pepper, and coriander. Sprinkle on the tuna. Refrigerate, covered, for at least 20 minutes or up to 24 hours.
GRILL FISH
Spray the grill rack with nonstick spray. Grill the tuna, 5" from the heat, until browned on the outside but still a little pink in the center, about 3-4 minutes on each side. Serve with salsa.
I'm not much of a food photographer, but here's a picture I thought to take before we sat down to eat:
Grilled Tuna with Mango-Blueberry Salsa
adapted from WeightWatchers Entertains (2002)
6 servings
1 ripe mango, peeled and diced
1 cup blueberries, chopped (I used frozen blueberries--easier to chop than fresh, and I had them on hand)
1/2 red onion, finely chopped
3 T. chopped fresh cilantro
2 t. grated lime rind (1 t. for salsa, 1 for fish marinade)
4 T. fresh lime juice (1 T. for salsa, 3 T. for fish marinade)
1 t. salt (1/2 t. for salsa, 1/2 t. for fish)
1/2 t. sugar
1/2 of a small jalapeno pepper, seeded & finely chopped
6 (5 oz) tuna steaks, about 3/4" thick
1/2 t. coarsely ground pepper
scant 1/2 t. ground coriander
SALSA
If using frozen blueberries, rinse with water to take off any ice and let drain, then chop. Combine the mango, blueberries, onion, cilantro, 1 t. of lime rind, 1 T. of lime juice, 1/2 t. of salt, sugar, and jalapeno. Cover and refrigerate for at least 20 minutes or up to 3 days.MARINATE FISH
Mix together the remaining 1 t. lime rind, 3 T. lime juice, 1/2 t. salt, ground pepper, and coriander. Sprinkle on the tuna. Refrigerate, covered, for at least 20 minutes or up to 24 hours.
GRILL FISH
Spray the grill rack with nonstick spray. Grill the tuna, 5" from the heat, until browned on the outside but still a little pink in the center, about 3-4 minutes on each side. Serve with salsa.
Monday, March 5, 2012
Skillet lasagna
SKILLET LASAGNA (from Louise Gates)
4-6 servings
adapted from America’s Test Kitchen Television Show 10th Anniversary Best Recipes 2001-2010
If Louise and I aren't talking about quilting, the conversation is likely to be about food. Turns out we both feel the same way about lasagna—love to eat it, but don't like putting it together. Louise has the answer: lasagna ingredients cooked all together in a skillet dish. Amazingly, it has all the flavor of regular lasagna! I actually like it better—not as heavy a dish. This recipe will also go on my list for "good to bring to a potluck, or to someone's house who's having meals brought in."
1 28-oz can diced tomatoes
2 t. olive oil
1 onion, diced
1/2 t. salt
3 cloves garlic, minced
1/8 t. crushed red pepper
1 lb. ground beef or sausage (any kind, including chicken or turkey)
10 curly-edged regular lasagna noodles, broken into 2-inch lengths
1 8-oz can tomato sauce
1/2 cup freshly grated parmesan cheese (put aside 2 T. of this)
4-8 oz. shredded mozzarella cheese (I used about 6 oz)
salt and pepper to taste
8-15 oz. part-skim ricotta (I used about 12 oz)
3 T. minced fresh basil (if available)
1. Pour the tomatoes with their juice into a 4-cup measuring cup. Add enough water to the tomatoes to measure 4 cups.
2. Heat the oil in a 12-inch nonstick skillet over medium heat. Add the onion, garlic, and 1/2 t. salt and cook until softened, about 6 minutes.
3. Stir in the red pepper flakes and cook until fragrant, about 15 seconds. Add the ground meat and cook, breaking up the meat into small pieces, until no longer pink, about 4 minutes.
4. Scatter the noodle pieces over the meat, but do not stir. Pour the diced tomatoes and the can of tomato sauce over the pasta. Cover and bring to a simmer. Reduce the heat and continue to simmer, stirring occasionally [or not—I forgot to], until the pasta is tender, about 20 minutes.
5. Turn off the heat under the skillet (gas stove) or take off the burner (electric). Stir in the mozzarella cheese and all but 2 T. of the parmesan. Season with salt and pepper to taste. If serving to guests, transfer to a casserole dish with a cover. (Thanks for this tip to Louise's son Tony.)
6. Dot heaping tablespoons of the ricotta cheese over the noodles. Cover the skillet/casserole and let stand off the heat for five minutes.
7. Sprinkle with the fresh basil and pass the extra parmesan around for a garnish.
Notes:
- I forgot to put in the 8 oz. can of tomato sauce—still was great!
- I didn't have fresh basil, so I just left this out. If I'd thought ahead, I would have put some dried basil in with the tomatoes, but it was also fine without. I'll use fresh basil in the summer, when I have plants in the back yard.
- The recipe called for 8 oz. of mozzarella and 15 oz. of ricotta, but I cut back to save some calories. Still great. I could probably have cut back even more, hence the suggested range given above.
Sunday, March 4, 2012
Baked Tortilla Chips
The other day I needed some tortilla chips for a dip, and didn't want to make a trip to the grocery store just for the one item. I happened to have corn tortillas in the refrigerator, so I looked up recipes on the web and made up a batch. With a couple of tweaks and another try tonight, here's what worked really well for me. These are MUCH better than store-bought chips, and also lower in fat/calories.
corn tortillas (I can get 8-9 tortillas on two cookie sheets)
spray olive oil
salt (or seasoned salt)
Preheat oven to 400 degrees.
Spread the tortillas out on one or more baking sheets and spray lightly with olive oil. Turn and spray the other side. Then put the tortillas in a stack and cut into eighths. Spread the pieces on one or more baking sheets, sprinkle lightly with salt (or seasoned salt) and put in oven. (You could also skip the salt.) Bake for 11-12 minutes, until crisp. No need to flip the chips over while baking. I did two baking sheets in the oven at once, and that worked fine.
That's it!
(Addendum 6/15/16: The Simply Recipes site gives a method for making chips in the microwave, which would be a good option for a hot day when you don't want to turn on the oven. I haven't tried it, so can't recommend, but you can find the directions here; scroll down to the third method (after fried and baked).
corn tortillas (I can get 8-9 tortillas on two cookie sheets)
spray olive oil
salt (or seasoned salt)
Preheat oven to 400 degrees.
Spread the tortillas out on one or more baking sheets and spray lightly with olive oil. Turn and spray the other side. Then put the tortillas in a stack and cut into eighths. Spread the pieces on one or more baking sheets, sprinkle lightly with salt (or seasoned salt) and put in oven. (You could also skip the salt.) Bake for 11-12 minutes, until crisp. No need to flip the chips over while baking. I did two baking sheets in the oven at once, and that worked fine.
That's it!
(Addendum 6/15/16: The Simply Recipes site gives a method for making chips in the microwave, which would be a good option for a hot day when you don't want to turn on the oven. I haven't tried it, so can't recommend, but you can find the directions here; scroll down to the third method (after fried and baked).
Sunday, January 1, 2012
Praise for the immersion blender
A month or so ago, I was in the Chicago area, and after a nice dinner out with friends, we wandered into Sur la Table. I saw this Cuisinart immersion stick blender on sale for $25 and made an impulse buy. Now I only wonder why I waited so many years to buy this little appliance. Well, I know why--I figured that since I already own a blender and food processor, this was totally unnecessary and would just be one more appliance on the counter. But now I find that for someone like me who loves making soups, many of which involve blending, this is great! No more transferring of hot soup to the blender or food processor, and no more cleaning up the soup that sloshes out. Just stick the blender stick in the pot of soup, press the button, and it's done. And the clean-up is so much easier, too. Instead of the big, awkward pieces of the blender or food processor to wash, you just detach the mixer part from the colored handle with the press of a button, and run it under the faucet.
September 2, 2020: The link I had in the original post no longer works, and the current models of a similar Cuisinart blender are about $45. You can browse Amazon for less expensive brands. Don't worry about how many speeds the blender has. Mine has just one speed.
Tomato Soup with Coriander
A couple of years ago, my friend Natania was going away for several months and lent me one of her favorite cookbooks to use while she was gone--a great idea for sharing a beloved cookbook. Of the recipes I tried, my favorite is this one for "Soupe à la Coriandre." Last night, I made it to bring to a New Year's Eve dinner, and everyone loved it, so here's the recipe. It's one of those recipes that I look at each time and think, "It looks too simple to be as special as I remember it." Then I make it again, and re-discover that simple can be special too.
2 bunches cilantro
1 T. olive oil
1 onion, chopped
2 garlic cloves, minced
1 t. ground cumin
1-1/2 t. paprika
1 28-oz can diced tomatoes, with juice
28 oz. water
4 T. tomato paste
salt and freshly ground pepper
1/2 c. vermicelli or angel hair spaghetti, broken into pieces--about 1"
juice of 1 lime
sprinkle of cayenne
2 T. cilantro leaves for garnish (optional)
Heat oil in a soup pot and sauté the onion over medium-low heat until tender. Tie the bunches of cilantro together with a string, so that they can be easily removed after soup simmers.
Add the garlic, cumin, and paprika to the onion and sauté for a minute. Add the tomatoes with their juice, the water, tomato paste, the 2 bunches of cilantro, and salt/pepper to taste. Bring to a simmer, cover, and simmer 30 minutes.
Turn off the heat. Take out the cilantro and discard. Blend the soup (using an immersion blender makes this easy). Bring the soup back to a simmer and add in the pasta. Cook until the pasta is al dente, adjust seasonings, and stir in the cayenne and lime juice. Garnish with additional cilantro (if using) and serve. (It's nice to have the garnish, but you do need the full two bunches in the soup, and sometimes I don't feel like buying a 3rd bunch just for the 2 T. of garnish. The soup is still great, even without the garnish--just a matter of appearance.)
Shulman emphasizes that the soup should be served at once, and that if you make it ahead (which is fine) or freeze it, that you should put in the pasta only later, when you are going to serve the soup. But last night the soup sat for an hour or so before we ate it, and it was just fine. And this morning I ate the leftovers, and that was fine too. So don't worry about how long it sits with the pasta already cooked!
Enjoy--
Penny
TOMATO SOUP WITH CORIANDER
adapted from Martha Rose Shulman, Mediterranean Light
6 servings (for a first-course soup)
2 bunches cilantro
1 T. olive oil
1 onion, chopped
2 garlic cloves, minced
1 t. ground cumin
1-1/2 t. paprika
1 28-oz can diced tomatoes, with juice
28 oz. water
4 T. tomato paste
salt and freshly ground pepper
1/2 c. vermicelli or angel hair spaghetti, broken into pieces--about 1"
juice of 1 lime
sprinkle of cayenne
2 T. cilantro leaves for garnish (optional)
Heat oil in a soup pot and sauté the onion over medium-low heat until tender. Tie the bunches of cilantro together with a string, so that they can be easily removed after soup simmers.
Add the garlic, cumin, and paprika to the onion and sauté for a minute. Add the tomatoes with their juice, the water, tomato paste, the 2 bunches of cilantro, and salt/pepper to taste. Bring to a simmer, cover, and simmer 30 minutes.
Turn off the heat. Take out the cilantro and discard. Blend the soup (using an immersion blender makes this easy). Bring the soup back to a simmer and add in the pasta. Cook until the pasta is al dente, adjust seasonings, and stir in the cayenne and lime juice. Garnish with additional cilantro (if using) and serve. (It's nice to have the garnish, but you do need the full two bunches in the soup, and sometimes I don't feel like buying a 3rd bunch just for the 2 T. of garnish. The soup is still great, even without the garnish--just a matter of appearance.)
Shulman emphasizes that the soup should be served at once, and that if you make it ahead (which is fine) or freeze it, that you should put in the pasta only later, when you are going to serve the soup. But last night the soup sat for an hour or so before we ate it, and it was just fine. And this morning I ate the leftovers, and that was fine too. So don't worry about how long it sits with the pasta already cooked!
Enjoy--
Penny
Monday, December 19, 2011
Butternut Squash Gratin with Blue Cheese and Sage
Welcome to guest blogger Laura Lane! Laura and I had this dish at a new restaurant in Galesburg where the all items are made from local food. We both loved the squash, and when we complimented the chef, he told us enough about it (including that he found the base recipe online) that we could duplicate it at home. Laura did the research and offered to share the recipe—it's really good. Thanks, Laura!
Penny and I tasted this wonderful dish at En Season Cafe. With advice from Chef Bart and an online recipe, I experimented. This is easy to make; peeling the squash is easy with a sharp peeler! Great side dish, although Rich and I enjoyed it as a main dish, along with salad and bread. You could get by with 1 T. sage, but we like a little more. And 1/2 cup of blue cheese would be more subtle--we like the strong flavors so went with 2/3 cup. Worked beautifully. And I hope you like it as well as we did!
Butternut Squash Gratin with Blue Cheese and Sage
from Laura Lane, adapted from http://www.myrecipes.com/recipe/butternut-squash-gratin-with-blue-cheese-sage-10000001860069/ via En Season Café
Ingredients
- 1 large butternut squash, peeled and cubed (3/4-inch) (about 2 pounds)
- 2 teaspoons olive oil
- 1 large onion, thinly sliced
- 1-1/2 T. chopped fresh sage
- 1/2 t. salt
- 1/4 t. freshly ground black pepper
- Cooking spray
- 1 T butter (optional)
- 1/2-2/3 c. crumbled blue cheese
- 1/2 c. Panko bread crumbs
Preparation
1. Preheat oven to 400°.
2. Steam butternut squash, covered, 10-12 minutes or until tender. [PSG: This took me about 20 minutes; maybe my steamer isn't the best. . .]
3. Heat 2 teaspoons oil in a large skillet over medium-high heat. Sauté onion 5 minutes or until tender. In a large bowl, mix onion, butternut squash, chopped sage, salt, and black pepper to bowl, and toss gently. Spoon into 13 x 9 baking dish coated with cooking spray. Dot with butter. Sprinkle crumbled blue cheese evenly over squash mixture, and sprinkle breadcrumbs on top of cheese. Bake at 400° for 20-25 minutes, until the cheese is melted and crumbs are golden brown.
Subscribe to:
Posts (Atom)